Prototype Top Down Shooter
Posted On: Jun 13, 2023"Wait didn't you say no shooters?" you might be thinking, yes I did! However the top down shooter genre is a little different and more importantly it is really simple. If you followed the last prototype blog then a lot will be similar here. Let's dive in!
Just like last time I'm using 2020.3.46F1 LTS and the following packages Input System, Unity UI, 2D TileMap Editor as well as this plugin that will be used to parse the spritesheets from Kenney. Make a new project, I've named mine proto_top_down and create a scripts folder. Make a new script in that fold called Player.cs and open it up in your favorite editor.
Player Moving
First thing's first, we are going to get our player moving. We are going to be using the new Input System again with the inspector values instead of project wide values, again if we were making a more sophisticated game I would be setting up Input Actions at the project level. The goal is to get a player moving in eight directions.
using System;
using UnityEngine;
using UnityEngine.InputSystem;

public class Player : MonoBehaviour
{
    public InputAction movement;
    public float speed = 10;

    private Transform _transform;
    private Vector3 _position;
We simply declare some variables to be used for movement here, speed is how many units per second we should move.
    private void Start()
    {
        _transform = transform;
    }

    private void OnEnable()
    {
        movement.Enable();
    }

    private void OnDisable()
    {
        movement.Disable();
    }
Here we initialize the variables, cache the transform in start and turn on (or off) our input when this script is enabled (or disabled).
    private void Update()
    {
        var direction = movement.ReadValue();
        direction.Normalize();
        _transform.up = direction;
        direction *= speed * Time.deltaTime;

        _position.x = direction.x;
        _position.y = direction.y;
        _position.z = 0;
        _transform.position += _position;
    }
}
Now for the actual movement code, first we get the current input and store that in direction and normalize it. This is for keyboard so we don't go faster at angles. Next we set our transform's up vector to the direction we want to go then we increase direction by speed for this frame. Then we make sure there is no Z axis modifications (this is a 2d game so no need for Z) and update our _transform's position.
Prefab Setup
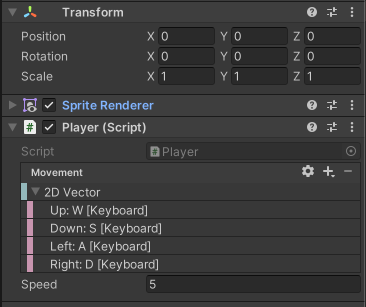
Make a prefab folder and add a prefab, open up said prefab and attach a Sprite Renderer to it, the default sprite is fine for now. Also add the Player script we just wrote. For the movement input add a 2D vector type, in the add drop down button select "Add Up/Down/Left/Right Composite" this makes a "2D Vector" input with an Up, Down, Left, Right binding. Fill this out with the keys W,S,A,D respectively. Set the speed value to what you want. Here is what I have, you should have something similar:
Spritesheet
Now is time to setup our spritesheet, we will use this for the player and the bullets. Head on over to Kenney's site and download the top down tanks (or the redux if you are feeling spicy). Import that into our unity project, I put the sprite sheet and the atlas xml file into a "Spritesheet" folder. Now right click on the xml atlas file for whichever tank pack you downloaded and select the option "Slice sprite using XML" this will open up a window to slice the sprite, the defaults should be fine.
Open up your Player prefab and assign a tank to the SpriteRenderer. I went with tankRed, but you can pick what color you like best. Now play the scene and you should see a tank moving around!

Awesome, but not really interesting, lets add more
Player Aiming
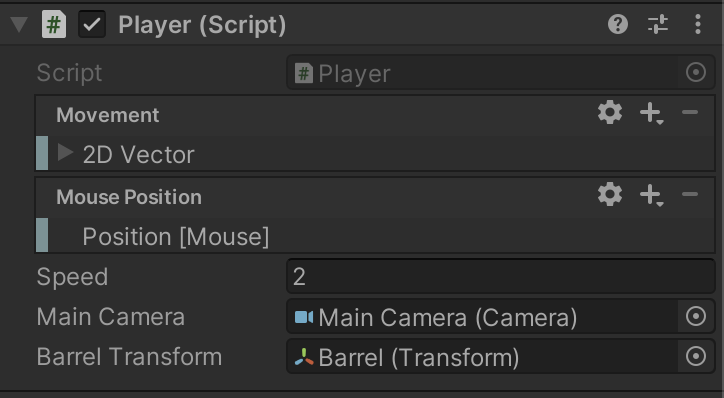
Since you have the player prefab open still, lets add some gameObjects for aiming. Add a child called "Barrel" this will be an empty game object that we will rotate to move the art around, set the "Barrel" gameObject's position to (0, 0, 0). Add a child of the Barrel and call it "BarrelArt" we will add a SpriteRenderer to this and then select a Sprite that matches your tank color (or don't, it's up to you), set the BarrelArt's position to "up" so that the bottom of the sprite is at the center of the tank (right on the parent's position). Mine is set o (0, 0.24, 0). Finally make another empty gameObject under the BarrelArt called "projectileSpawn" and move it to the "tip" of the barrel, mine is set to (0, 0.232, 0). The projectileSpawn gameObject won't be used for this section as we only want to aim, the next section will use though!
With the setup done we can move onto the code! First lets add some variables for aiming:
    public InputAction mousePosition;
    public Camera mainCamera;
    public Transform barrelTransform;
And a private variable:
private Action _aimingFunction;Lets use some of those by revisiting the OnEnable method:
    private void OnEnable()
    {
        movement.Enable();
        mousePosition.Enable();
        _aimingFunction = MouseAim;
        // TODO: Aim stick
    }
And add this to the OnDisable method:
mousePosition.Disable();Ok variables are setup, I'll show you the mousePosition setup on the prefab in a bit so don't worry about that. Let's actually start some aiming! So the idea here is to point the barrel of the tank in the direction of the mouse, we can do that by taking the mouse's position and subtract it by the tank's position:
    private void MouseAim()
    {
        var mousePos = mousePosition.ReadValue();
        var mouseWorld = mainCamera.ScreenToWorldPoint(mousePos);
        mouseWorld.z = _transform.position.z;
        var direction = mouseWorld - _transform.position;
        direction.Normalize();

        var cross = Vector3.Cross(Vector3.up, direction);
        var dot = Vector3.Dot(Vector3.up, direction);
        var angle = Mathf.Acos(dot) * Mathf.Rad2Deg;

        if (cross.z < 0)
        {
            angle *= -1;
        }

        barrelTransform.eulerAngles = Vector3.forward * angle;
    }
Finally in your Update method after the position stuff add this line:
_aimingFunction();You'll notice that I've elected to store the aiming function inside of a delegate (function pointer), this was so that we could switch between mouse aiming and joystick aiming using events instead of if checks inside the update loop. You'll also notice that I don't have any implementation of the joystick code, that's an exercise for the user!
Oh and here is what the aiming input action looks like:
Here is what we've got so far:

Aiming is nice and all, but if we can't fire something it's useless!
Player Firing
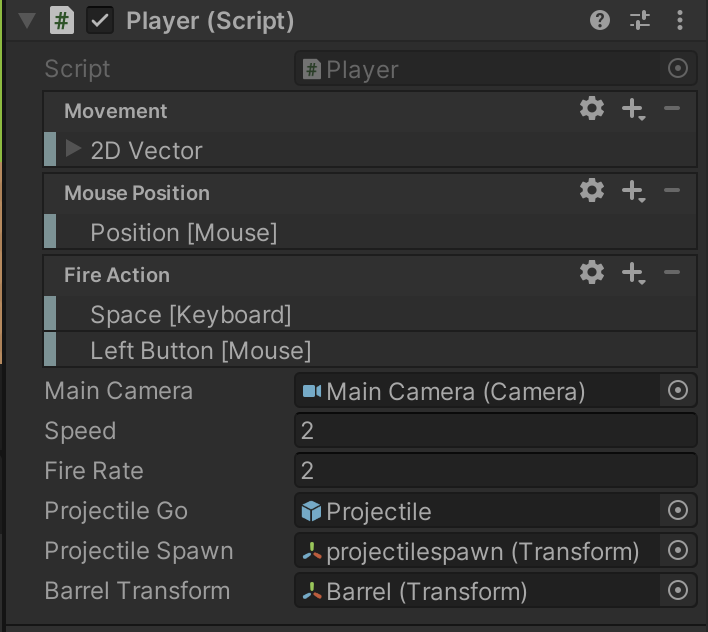
I'm going to use a projectile for this one as opposed to a raycast (hitscan), with this method we will have to spawn a gameObject. We are also going to have a rate of fire, as you typically do. Here are the public variables we will need for this:
    public InputAction fireAction;
    public float fireRate;
    public GameObject projectileGo;
    public Transform projectileSpawn;

    private float _lastFireTime;
    private bool _wantFire;
I snuck in some private variables at the end there, if you like to orginize you code by public private then be mindful of that. We have another InputAction so lets add that to our OnEnable and OnDisable:
    fireAction.Enable();
    fireAction.started += StartFire
    fireAction.canceled += EndFire;
And in OnDisable
fireAction.Disabel();Notice how this is a little more complicated than the other inputs, here we setup callbacks for when the user presses the fire button(s) (started) and when the user releases the fire button(s) (canceled). Unity named these well as other things could prevent input from happening, not just pressing and releasing buttons. Let's implement those callbacks:
    private void StartFire(InputAction.CallbackContext cbContext)
    {
        _wantFire = true;
    }

    private void EndFire(InputAction.CallbackContext cbContext)
    {
        _wantFire = false;
    }
Basic stuff on the start callback method we set the _wantFire to true, on the canceled callback method we set it to false. Why don't we just write the firing logic within those methods? A few reasons, the biggest being these callbacks don't get called every frame. Instead they get called when the action happens (event). Another could be replication, if we had a need server/client architecture then the client won't be spawning the bullets the server will and this can be used to bridge the gap between the user's input on the client side and the server running all of the inputs (and the game)
Now lets actually spawn a projectile, append this to the end of your Update method:
        if (_wantFire && _lastFireTime + (1 / fireRate) < Time.time)
        {
            _lastFireTime = Time.time;

            Instantiate(projectileGo, projectileSpawn.position, projectileSpawn.rotation);
        }
Here we check if we want to fire and compare that with the last time we fired plus our rate of fire is less than the current time. If all that is true then we can spawn a new projectile, and update our last fire time.
Cool, let's start firing... Oh wait we need something to fire!
Projectile
We are first going to make a script for our projectile, then we will setup a prefab for it, and finally hook up the prefab to the Player's prefab. So in your scripts folder add a new script called Projectile.cs and input the following:
using UnityEngine;

[RequireComponent(typeof(Rigidbody2D))]
public class Projectile : MonoBehaviour
{
    private Transform _transform;
    private Rigidbody2D _rigidbody;

    public float speed = 7;

    private void Start()
    {
        _transform = transform;
        _rigidbody = GetComponent();
        _rigidbody.gravityScale = 0;
    }

    private void Update()
    {
        _transform.position += _transform.up * (speed * Time.deltaTime);
    }
}
Small script, if you remember from our firing code in the Player script we set the position and rotation of the projectile, so here we only need to move forward. Start sets up some variables and turns off gravity because this is a topdown shooter and gravity is represented differently here. Update moves the projectile forward.
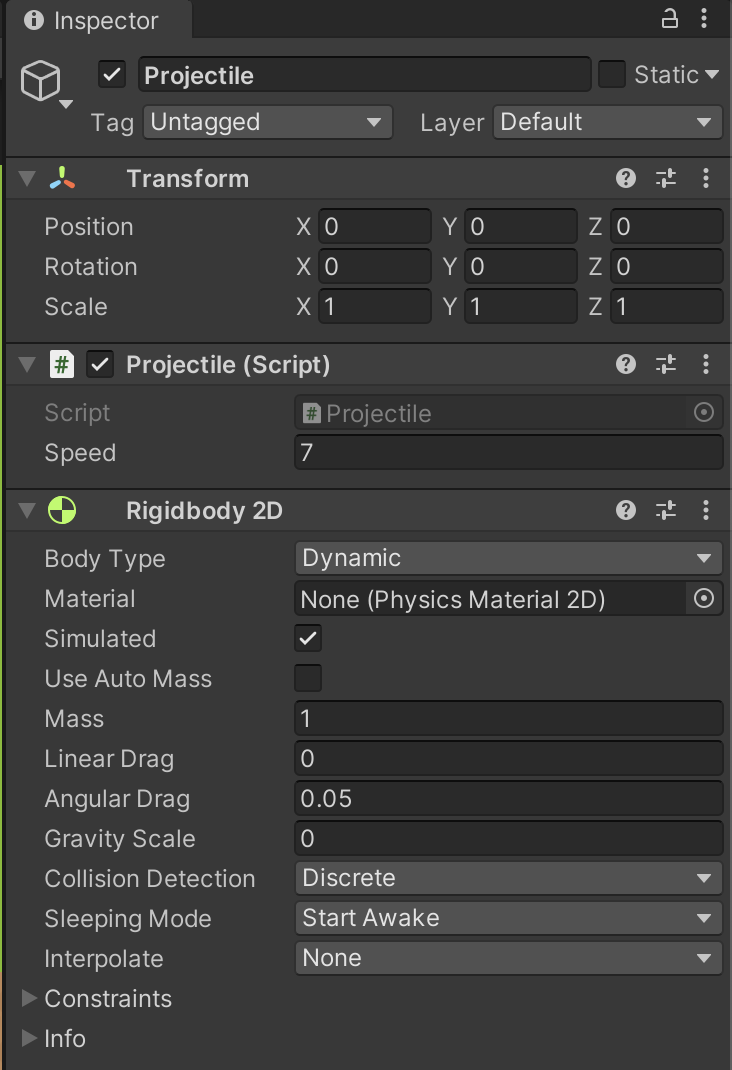
Now make a new prefab in your prefab folder, name it "prefab". We are going to add our Projectile script (this will add a Rigidbody 2D component as well), then make an empty gameObject under that and add a SpriteRenderer and a BoxCollider2D. For the Sprite on the SpriteRenderer I chose "bulletRed" you can pick whatever you want.
![]()
Now that we have a projectile, we can add the prefab to the player prefab:
Conclusion
Awesome we have a moving tank, that can aim and shoot bullets! Hopefully you got a good understanding of how to prototype this sort of game. Here is the full source to the unity project.