Prototype Racing game
Posted On: May 09, 2023Before I started my journey at Pipeworks I basically have only worked on shooters, mostly third person and one first person, so I've never thought about how to engineer other genres types. This is the first of a series of prototypes that aren't shooters, the racing prototype.
The goal of this prototype is to get basic car logic driving around a test level, off road detection, and a simple lap timer. I'm using Unity 2020.3.46f1 LTS and this project is a 2D project so make a new project with that setup. I'm sure Unity 2021 and 2022 works as well, but I have not tested those versions.
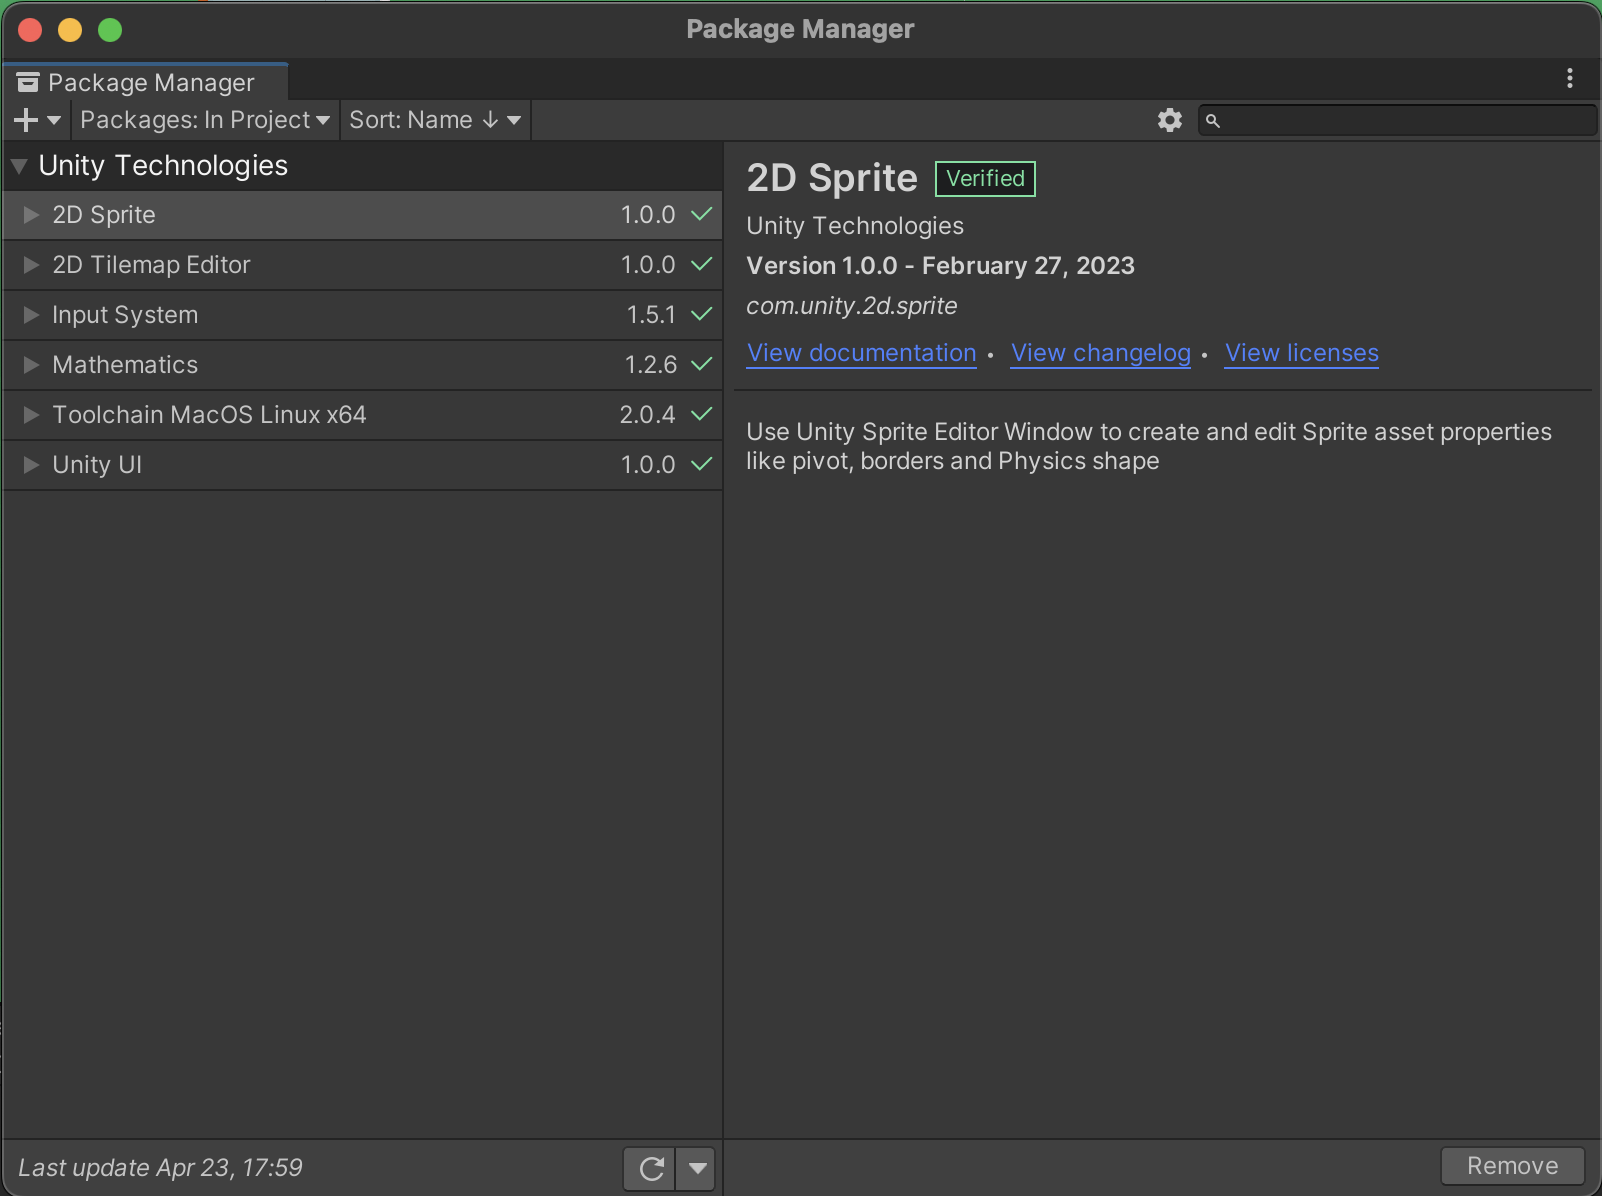
Unity Packages
Before we can program we'll need to install some packages: Input System, Unity UI, and 2D Tilemap Editor. Go to Window -> Package Manager and select the drop down that might say Packages: In Project and select Packages: Unity Registry use the search function to download the mentioned packages.
 We have to let unity know that we want the new Input system, got to
 Edit -> Project Settings in the Project Settings window find the Player options, expand Other Options and scroll down to the Configuration header, at the end of the Configuration block is a label called Active Input Handling set that to Input System Package (New).
 With that out of the way we can start coding, first in Unity make a Scripts folder if you haven't already and make a new C# script in that folder called
 CarLogic.
Car Logic
OK with CarLogic.cs open in your favorite editor we can start writing some code. We are going to need the new Input System, and we want to require Rigidbody2D, and declare some variables first. Here's what that looks like:
using UnityEngine;
using UnityEngine.InputSystem; // Note the InputSystem include

[RequireComponent(typeof(Rigidbody2D))]
public class CarLogic : MonoBehaviour
{
	public InputAction steeringAction;
	public InputAction accelerationAction;
	public InputAction brakeAction;

	public float accelerationAmount = 10;
	[Tooltip("In degrees")]
	public float steeringAnglePerSecond = 10;

	public float maxAcceleration = 100;
	public float brakingAmount;

	private Rigidbody2D _rigidbody;
	private Transform _transform;
    private float _currentAcceleration;
The input actions should be self explanatory, the public floats will help us tweak our cars behaviour, and we have some internal variables that we need to initialize.
    private void Awake()
	{
		_rigidbody = GetComponent();
		_transform = transform;
	}

	private void OnEnable()
	{
		steeringAction.Enable();
		accelerationAction.Enable();
		brakeAction.Enable();
	}

	private void OnDisable()
	{
		steeringAction.Disable();
		accelerationAction.Disable();
		brakeAction.Disable();
	}
If you've done a lot of Unity programming this should look familiar, if not here is a quick explanation: in the Awake method (called on all MonoBehaviours, before Start) we grab some components that we will use frequently (every frame).
There are two ways to use the new input system, the way I opted to do it here is called embedded, the other way is to use the Action editor. If we had different styles of cars or other controllable things (a player that can get into or out of cars, or motorcycles) then the Action editor is the way to go.
Refer to the docs for more information. Since we used the embedded style, we manually have to enable/disable the actions so tying them to the MonoBehaviour's OnEnable and OnDisable is a good idea because we won't want to process input if the gameObject is disabled (crashed, race over, etc).
Now that everything is set up we can write the update loop. Instead of fully utilizing Unity's physics I opted to write a little bit of custom acceleration behavior. Also the steering code could use some love, it works for a prototype but I'd want more sophisticated behavior in an actual game.
	private void Update()
	{
		var steeringValue = steeringAction.ReadValue();
		var accelerationValue = accelerationAction.ReadValue();
		var brakeValue = brakeAction.ReadValue();

		if (accelerationValue <= 0)
		{
			_currentAcceleration -= _rigidbody.drag * Time.deltaTime;
		}

		_currentAcceleration += accelerationValue * accelerationAmount * Time.deltaTime;

		_currentAcceleration -= brakeValue * brakingAmount * Time.deltaTime;

		// TODO: reverse logic.
		_currentAcceleration = Mathf.Clamp(_currentAcceleration, 0, maxAcceleration);

		if (_currentAcceleration > 0.01)
		{
			var newAngle = steeringValue * steeringAnglePerSecond * Time.deltaTime;
			_transform.Rotate(Vector3.forward, newAngle, Space.World);
		}

		_rigidbody.velocity = _transform.up * _currentAcceleration;
    }
Firstly we poll for input ReadValue on our actions gets us the value for this frame. Next we check if the user is pressing the accelerate button, if not (a value of 0) then we apply some deceleration using the drag value on our Rigidbody. Then we apply the acceleration to our _currentAcceleration value, we also apply the brake value as well. We then clamp the _currentAcceleration value between 0 and whatever we set maxAcceleration to be.
Now for some less than ideal code, I didn't spend a lot of time on this admittedly, we make sure that we are accelerating then we calculate a new angle based on the steeringValue and what we set steeringAnglePerSecond to be. Then we rotate our transform by newAngle. Finally we set the rigidbody's velocity.
Car prefab setup
Now we need to setup the car's prefab! If you haven't already make a Prefab folder in Assets -> Prefabs then on that folder right click and select Create, then select prefab in the third section from the top name it "Car" or whatever you deem a worthy name for your vehicle. Here we are going to add a sprite renderer. Click Add component at the bottom of the inspector window and type in and select Sprite Renderer. We will add a car sprite in a little bit, for now the default square should be fine. Next add a Rigidbody2D to the car prefab. Finally add our CarLogic to the prefab.
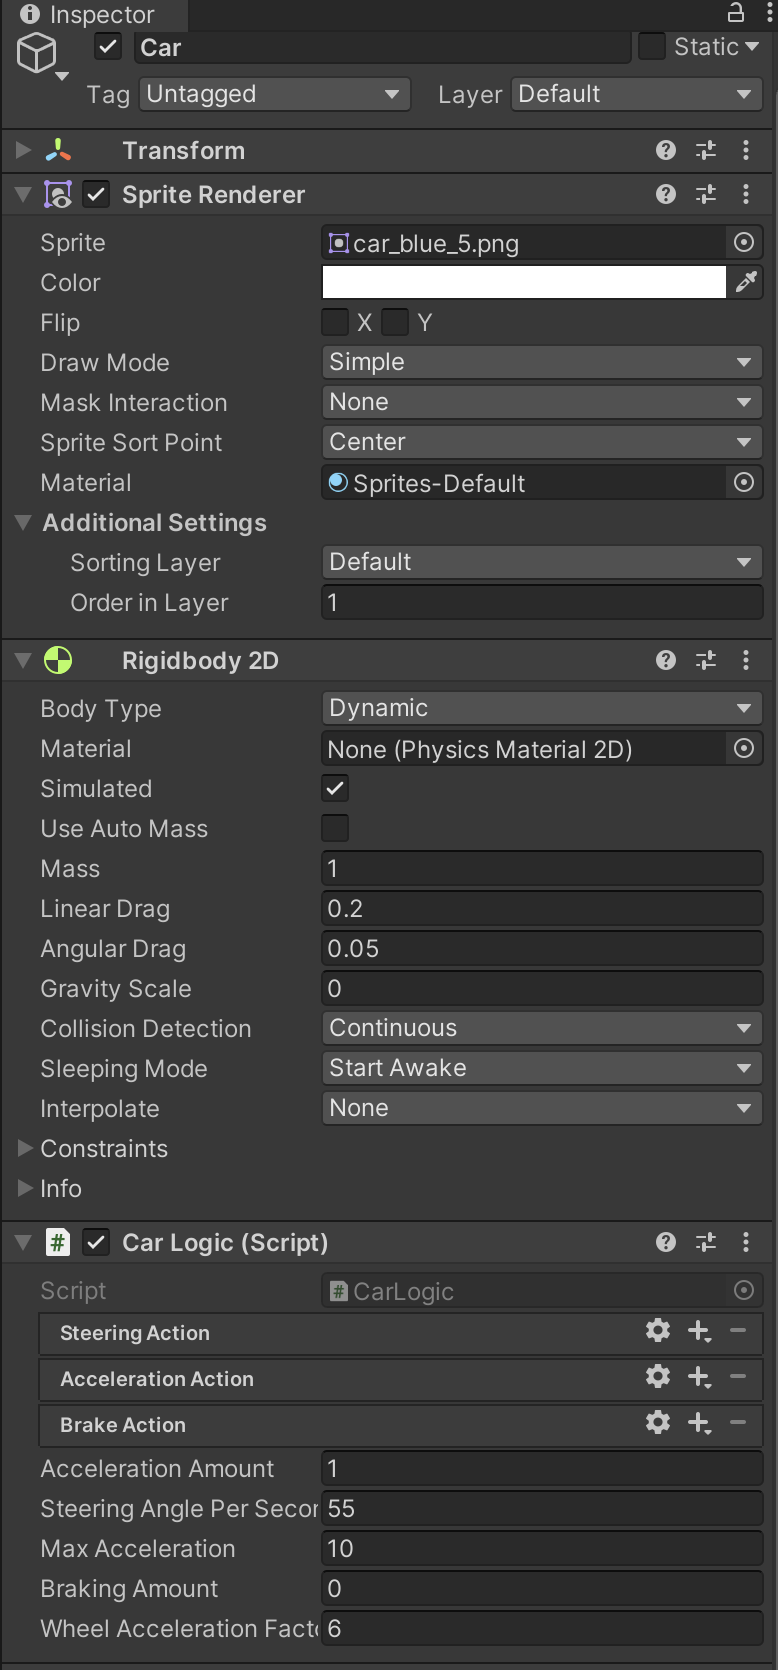
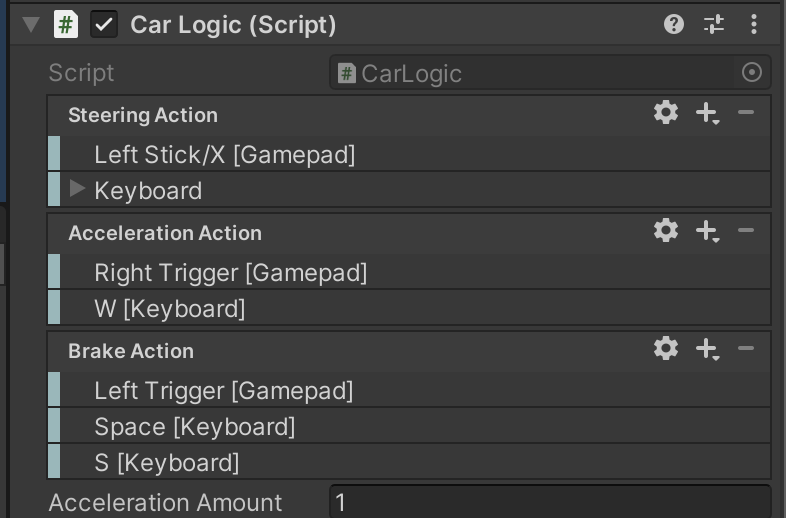
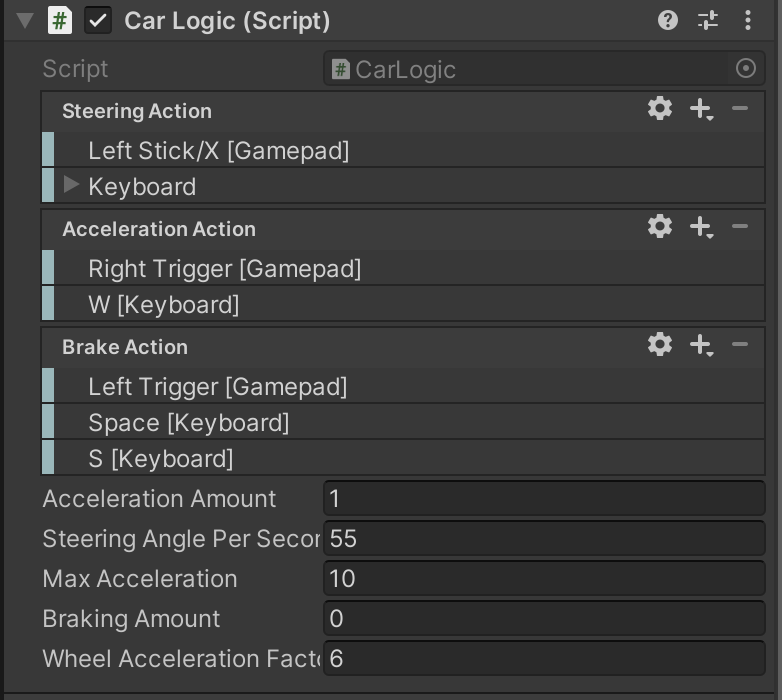
We are now going to setup our steering actions, next to that variable select the "+" button and select "Add Positive/Negative Binding" and name the new binding "Keyboard". Double click the negative binding and under "Path" select "D [Keyboard]". Do the same for the positive binding selecting "A [Keyboard]" for the path.
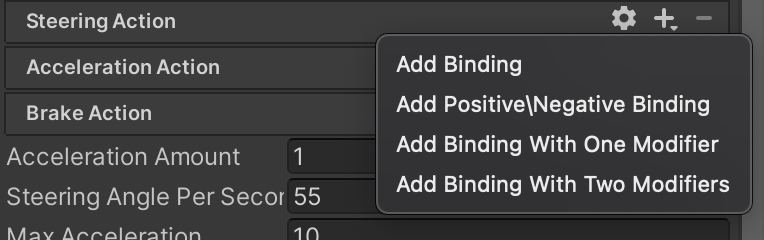
For the acceleration action, select the "+" again and this time select "Add binding", here we are going to select only one key: "W [Keyboard]".
Do the same for the brake action, only with "S [Keyboard]". I also found it easier to control with a binding to "Space [Keyboard]", but you can do what makes sense to you.
You can add gamepad bindings if you want, they are similar only you use binding for all of them because unity will read them as an axis. After that's done you will have something that looks like this:
For the values you can use what makes feels best to you, here is what I think feels good for the level that we're about to make:
Camera follow
If you run the editor now you will notice that it is hard to play because the car drives off screen quickly. Lets make a simple Follow.cs script:
public class Follow : MonoBehaviour
{
    public Transform target;

    public Vector3 offset;

    private Transform _transform;

    private void Awake()
    {
        _transform = transform;
    }

    private void Update()
    {
        _transform.position = target.position + offset;
        _transform.rotation = target.rotation;
    }
}
Simple stuff, public target so we can assign it in the inspector (or through code), an offset in case we don't want the object to be exactly were the target is, and our transform. Every frame we set our object's position to the targets position plus offset, and our rotation to the target's rotation.
In the Scene I have a "CameraBoom" Empty GameObject that has the Main Camera as a child, this is how I used to do the offset until I added it. You can choose to do the same or add the Follow script to the Main Camera game object directly with an offset of {0, 2.5, -10}, or whatever works best for you. Regardless of method, make sure the car prefab is in the scene and it is set to the Target of the Follow script.
Now if you play the camera should be following the car, but how can we tell that we are moving? Time to build the level!
Track Setup
We are going to be using Kenney's racing pack for our assets so download that here, once downloaded and unzipped put the contents of the "Spritesheets" folder in your "Assets" folder. I made a folder called "Spritesheets" to keep things organized. Once that is done you will need to download this XML Texture Asset Slicer so we can slice the spritesheets we got from Kenney automagically instead of doing it one at a time. Follow the instructions on the asset store page, should be a simple right click on the spritesheet and making sure it selected the correct xml file.
Before we get into the track setup let's revisit the car prefab and quickly update the sprite to that of a car. Select the "Car" prefab and select the "Sprite" under the "Sprite Renderer", I selected "car_blue_5" but you can select what you want here.
Add a grid to our scene by selecting GameObject -> 2D Objects -> Tilemap -> Rectangular This will add a Grid GameObject and a child object with a Tilemap and TilemapRenderer attached, call this "BKG" for background. That should have also brought up a "Tile Palette" window, now this window is special so anchor it now before we lose it. Before we can paint any tiles we will need to create the palettes so in that window you just docked, under the "Active Tilemap" there should be another drop down all the way to the left. This is to select a palette, drop that down and select "Create New Palette" name it "Road" and the defaults should be fine.
  Now we need to add the sliced sprites from our spritesheet, find spritesheet_tiles.png and drop that down, select all the sprites that match this: "land_grass##.png" where "##" is 01 - 14. Once selected move drag and drop the sprites onto the palette's grid box. This will prompt you to select a directory for the palette data, I'm not too sure where to put this but I've placed mine in a new folder called "level_palettes" under my "Assets" folder. Now do the same for "road_asphalt##", I don't think I use all 90 tiles but I've imported them anyway.
Now we can start painting, I'm not going to guide you too much here as explaining all of this would be time consuming and would ruin the fun of level design! One thing I will say is that in sections down below it would be best to have anything in the BKG layer to be considered "not drivable" and for you to make a new Tilemap called "Road" that has all the drivable areas on it.
Here is what I came up with:
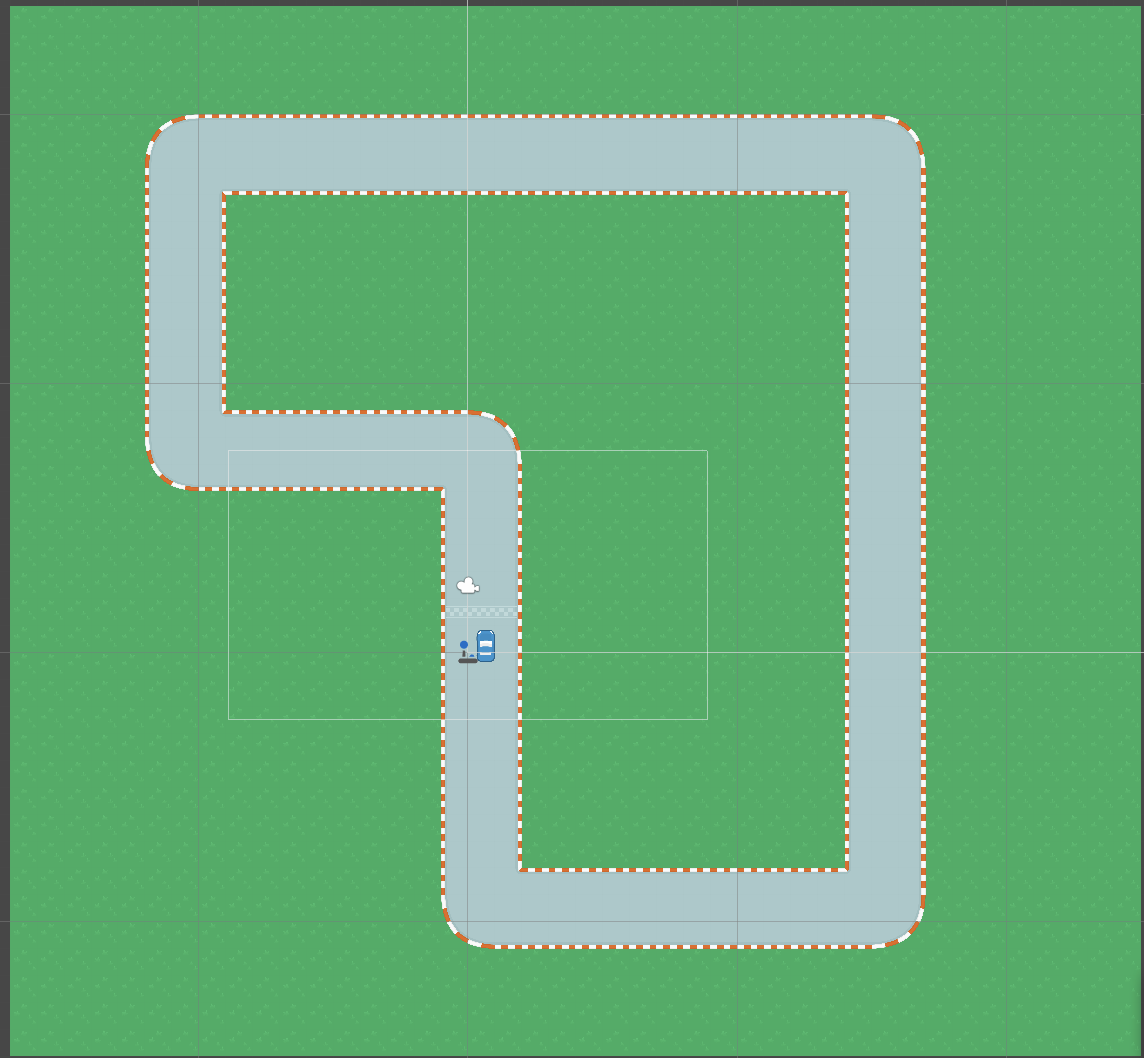
Feel free to do your own thing and adjust the car's values to see how the changes effect how you go through the level and vice versa
Lap Time
Now that we have a level that we can drive around in, lets make some incentive to actually follow the coarse instead of just driving where ever. Instead of a simple trigger collider that restarts a timer after you pass through it, lets take from the simulation racing games and give the level sectors! This will help mitigate against someone going off road to go in a circle crossing the finish line to get a super low lap time. First up is the Checkpoint
using System;
using UnityEngine;

public class CheckPoint : MonoBehaviour
{
    public Action CarPassed;

    private void OnTriggerEnter2D(Collider2D other)
    {
        CarPassed?.Invoke();
    }
}
Here is a simple class that fires an event when the collider is triggered, this is super simple right now and would have to be more sophisticated for a full racing game, but for a prototype this will be fine.
Next is the LapTime class, this will use a number of our Checkpoints and store some times for us:
using UnityEngine;

public class LapTime : MonoBehaviour
{
    public CheckPoint finishLine;
    public CheckPoint checkPoint1;
    public CheckPoint checkPoint2;
    public CheckPoint checkPoint3;

    private float _startTime = -1;
    private float _checkPoint1Time;
    private float _checkPoint2Time;
    private float _checkPoint3Time;
    private float _finishTime;
    private float _bestTime;
Declare the class, setup some variables, basic stuff. The CheckPoint variables are public because we will attach those to GameObjects in the scene then assign those to our LapTime object.
    private void Start()
    {
        finishLine.CarPassed += FinishedLine;
        checkPoint1.CarPassed += CheckPoint1Passed;
        checkPoint2.CarPassed += CheckPoint2Passed;
        checkPoint3.CarPassed += CheckPoint3Passed;
        _bestTime = float.MaxValue;
        _finishTime = float.MaxValue;
    }

    private void CheckPoint1Passed()
    {
        _checkPoint1Time = Time.time - _startTime;
    }

    private void CheckPoint2Passed()
    {
        _checkPoint2Time = Time.time - _startTime - _checkPoint1Time;
    }

    private void CheckPoint3Passed()
    {
        _checkPoint3Time = Time.time - _startTime - _checkPoint2Time - _checkPoint1Time;
    }
In the Start method we hook up our events we made in our CheckPoint class and set some variables. Next we do some prime prototype stuff! We have a specific method for each of our specific checkpoints, and we calculate the time between the last checkpoint (if any) and this checkpoint. Could we have setup a variable for this and collapse the three (3) methods into one (1)? Absolutely! Did I just now think of this? Of course!
    private void ResetTimers()
    {
        _startTime = Time.time;
        _checkPoint1Time = 0;
        _checkPoint2Time = 0;
        _checkPoint3Time = 0;
        if (_finishTime < _bestTime)
        {
            _bestTime = _finishTime;
        }
    }

    private void FinishedLine()
    {
        // make sure we didn't skip a checkpoint.
        if (_checkPoint1Time > 0 && _checkPoint2Time > 0 && _checkPoint3Time > 0)
        {
            // we finished
            _finishTime = Time.time - _startTime;
            ResetTimers();
        }
        else
        {
            _finishTime = float.MaxValue;
            ResetTimers();
        }
    }
}
In this slab of code we finish up the LapTime class, implement the ResetTimers method by just clearing out our variables, and updating our bestTime if we beat it.
The final method is FinishedLine (not sure why I named it FinishedLine instead of just FinishLine) in there is where we do our primitive checkpoint validation basically making sure the player passed through all the checkpoints. If they did then update the final time and start a new lap, if not then invalidate the lap time by setting it to zero and then reset the other times.
Now we are going to make the gameobjects for all this, make an empty gameobject to hold the LapTime then make a few child objects to hold the CheckPoints. Attach the Scripts, make sure the checkpoints have a Collider2D attached and it is set to trigger! Otherwise it will block the player.
We have all this code but no way to display it! Make a text object by going to GameObject -> UI -> Text, now we need some code to take the values from LapTime and display them:
using UnityEngine;
using UnityEngine.UI;

[RequireComponent(typeof(Text))]
public class LapTimeDisplay : MonoBehaviour
{
    private Text _text;
    public LapTime _lapTime;

    private void Start()
    {
        _text = GetComponent();
    }

    private void Update()
    {
        _text.text = _lapTime.GetTimeString();
    }
}
After you added the above text to a new script LapTimeDisplay.cs you can attach it to the new text UI object you just made. Hook up the LapTime object in your scene and you should be good to go!
Alright play around with that, you might want to adjust a few things depending how you made your level or where you placed your checkpoints. But we have a functional prototype! But if you play long enough then you notice you can just go from one checkpoint directly to the other without staying on the road which is kinda lame, cleaver, but lame. Let's fix that
Off Road Detection
Let's start by making a new script called Wheel.cs.
In your new Wheel MonoBehaviour you are going to set up a wheelOffRoad action and a wheelOnRoad action. On our car prefab, will have four child objects for the wheels. Here is the class in full:
using System;
using UnityEngine;

[RequireComponent(typeof(Collider2D))]
public class Wheel : MonoBehaviour
{
	public Action wheelOffRoad;
	public Action wheelOnRoad;

	private void OnTriggerExit2D(Collider2D other)
	{
		wheelOffRoad?.Invoke();
	}

	private void OnTriggerEnter2D(Collider2D other)
	{
		wheelOnRoad?.Invoke();
	}
}
OK now that we have the code let's update our prefab, open the Car prefab in edit mode and add 4 child objects one for each wheel of a car (front left and right, rear left and right). On each of the objects add a BoxCollider2D (any 2D collider will do) and also attach our Wheel script. Save the car prefab.

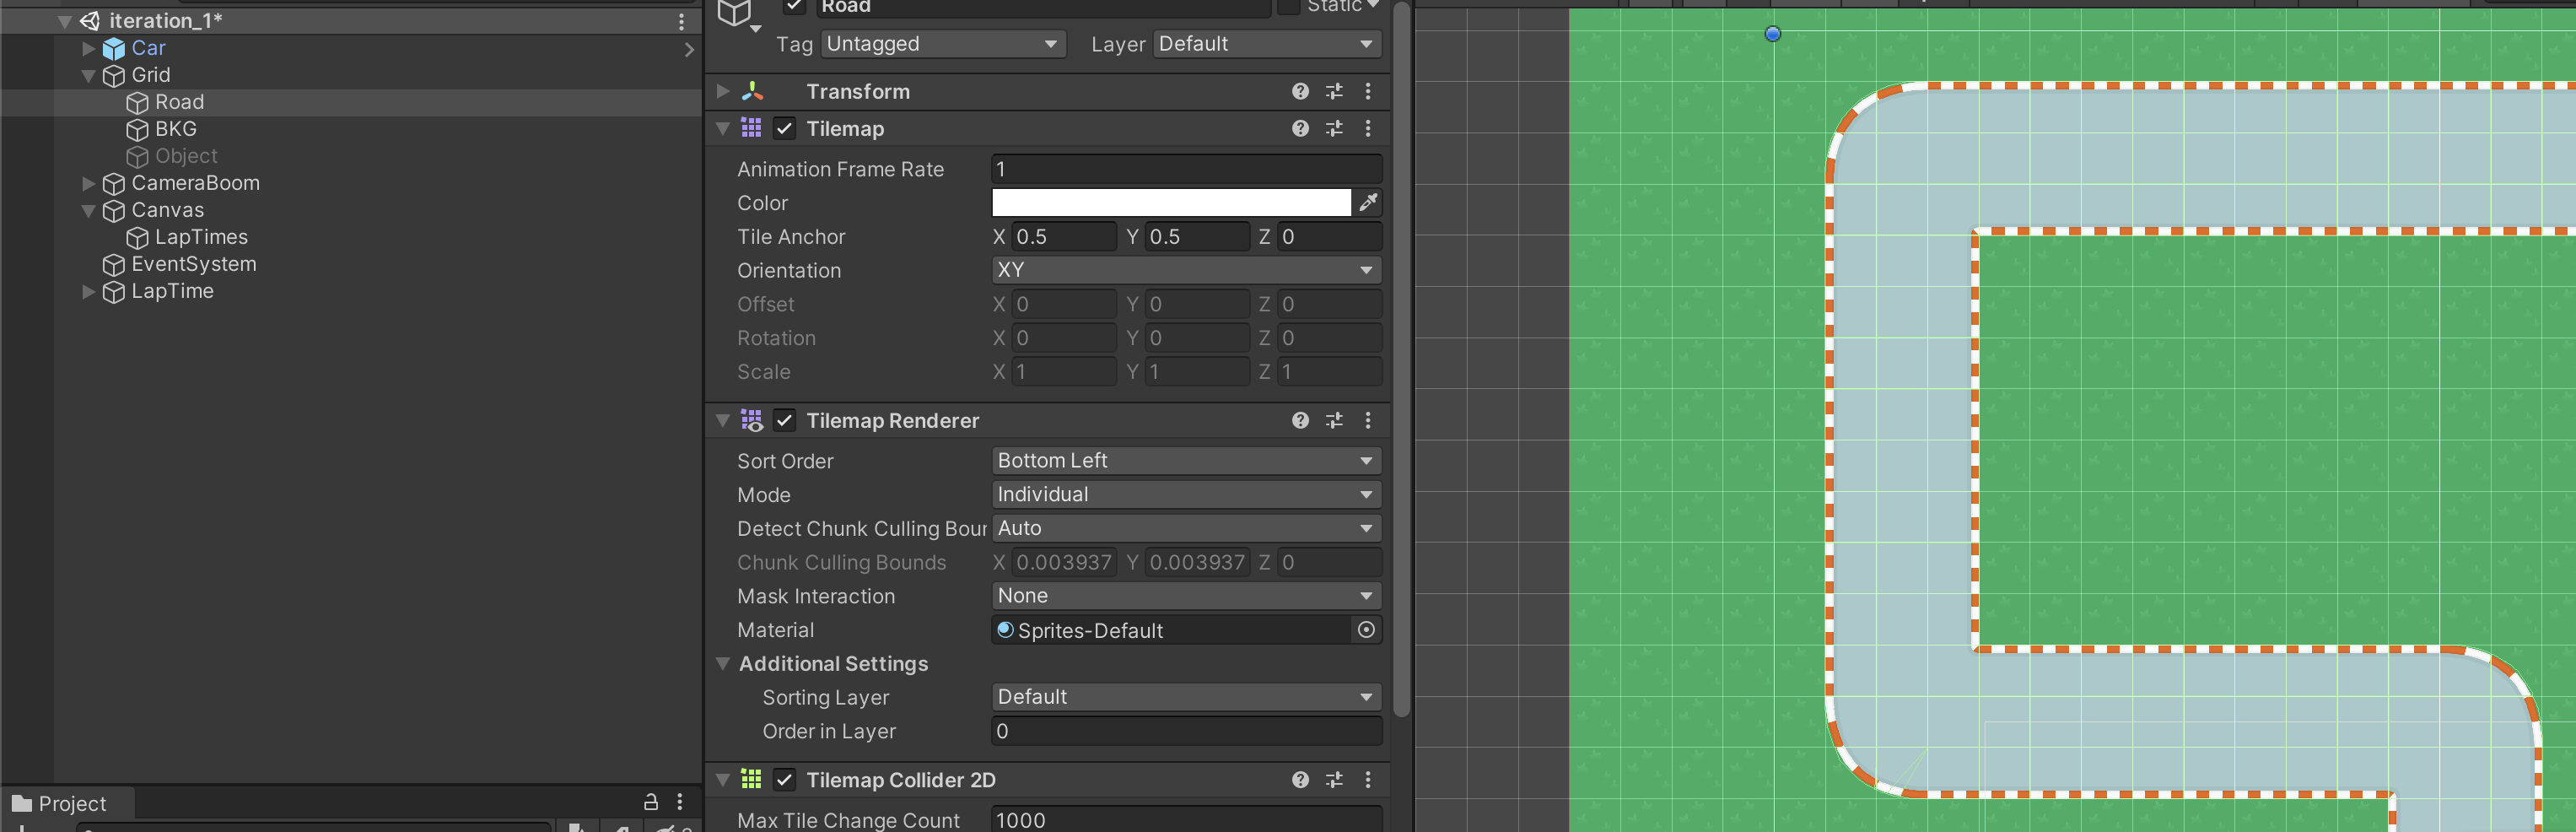
Now lets update our level to also have a collider so we can detect when we are off road, in the scene under our "Grid" object select the "Road" tilemap add a TilemapCollider2D.
We have wheels on the car and a road on the road, but nothing does anything yet! We need to update the CarLogic to handle the wheels! In the CarLogic script under the breakAmount public variable add this:
public float wheelAccelerationFactor = 6.0f;And under _currentAcceleration private variable add the following three variables:
    private int _wheelOnRoadCount = 0;
    private float _maxAcceleration;
    private float _wheelAccelerationOffset;
Initialize two of the three variables in your Awake method:
        _maxAcceleration = maxAcceleration;
        _wheelAccelerationOffset = wheelAccelerationFactor - 4;
Those variables are going to be used for our calculations later. Right now let's hook up the Wheel events, in our OnEnable method add the following:
        var wheels = GetComponentsInChildren();
        foreach (var wheel in wheels)
        {
            wheel.wheelOffRoad = WheelOffRoad;
            wheel.wheelOnRoad = WheelOnRoad;
        }

        _wheelOnRoadCount = 0;
Here we get all the child Wheel objects and assign the wheelOffRoad and wheelOnRoad events up to our CarLogic methods.
    private void WheelOffRoad()
    {
        _wheelOnRoadCount--;
        _maxAcceleration = ((_wheelOnRoadCount + _wheelAccelerationOffset) / wheelAccelerationFactor) * maxAcceleration;
    }

    private void WheelOnRoad()
    {
        _wheelOnRoadCount++;
        _maxAcceleration = ((_wheelOnRoadCount + _wheelAccelerationOffset) / wheelAccelerationFactor) * maxAcceleration;
    }
Here we do some calculations, we count how many wheels are on the road and use that to come up with our new _maxAcceleration based off the original maxAcceleration we set in the inspector. I'll explain the _wheelAccelerationOffset and the wheelAccelerationFactor, the simple explanation is these prevent the car from not accelerating when all 4 wheels are off the road. We essentially calculate how many wheelAccelerationFactors over maxAcceleration each wheel is worth, and to avoid having 0 over wheelAccelerationFactor we add _wheelAccelerationOffset to the current on road wheel value.
And the only change to Update is to the clamp at about line 91 now:
_currentAcceleration = Mathf.Clamp(_currentAcceleration, 0, _maxAcceleration);This should give us a nice slow down whenever our wheels go off road, causing more strategic gameplay out of the player! Nice.
All Done!
Phew, that was a lot! Congratulations on finishing it! Hope you learned a thing or two, and as always here is the source code (on my new gitea instance!)